Introduction
The Massdrop Alt is a superb (and expensive) keyboard. It’s a 65% board. It has individually addressable RGB backlighting and underglow. It’s USB-c and has a built in USB-c (but with only USB 2.0 bus) hub. It’s QMK compatible. It’s heavy and made of metal. It had linear switches available. It ticked off every want I had in a keyboard.

The Configurator: Customization Made Easy
Massdrop has an online configuration tool available that lets you graphically select the function and backlight of each individual key on each individual layer. After which, it compiles the selections into code for download for use with their flashing tool. This is super easy, gives great feedback, and is relatively painless. It’s also incredibly limited in what it can do. You can set individual colors, but you can’t configure animation. You can create many layers, but when you start to have those layers interacting with each other, sometimes they don’t work as desired. Further, you can’t really shuffle the layers around easily without deleting them and starting anew. There is a whole lot you can do there, but the limitations are very evident when you run into them, and frustratingly nontrivial to overcome.
QMK: Customization Made Difficult
QMK is some brilliant software written to create keyboard firmware for AVR/ARM (and more) processors. It’s also not simple to learn. I wanted to learn and build my own firmware though, because I wanted to have a more complicated layout. I also eventually want to do some custom animations and effects.
I found pleasuretek’s qmk_firmware fork that included some things I knew I would want. I still haven’t found any other forks that I’ve been interested in, so it’s the one I chose to start off with.
The Layers
Right away I started defining my layers before I even started programming. I wanted to keep the “default” layout as it seemed like it was a pretty sane basic layout to start from. The tilde and Escape key are shared, since there’s no function row, so I knew I’d want an osx/linux layer that made grave/tilde the default use on the key (I can’t think of the last time I used Escape in osx or linux anyway). I decided on a separate layer for osx from linux, so that I could have a layer that I swapped the meta and alt keys on to have a more macbook style layout.
I also wanted a game layer that would have a few keys swapped around as well as specific RGB effects. On my Ducky One 2, I’d swapped out the caps lock with Pause/Break so that I could have another key I could bind to controls (in this case, Discord chat) and I would frequently disable the meta key to prevent stupid meta-key related deaths. I thought about disabling the meta key again here, but I realized “why bother?” I could just change it to something else and then use that as a key in-game, just like the caps lock. So I decided it was going to be a backslash.
Finally, I needed a toggle layer for changing layers and extra keys that the keyboard didn’t have room for, including media/volume controls. There was a layer included in the default config to handle this that I just built on top of. But since I had layers that had swapped out Escape, I knew I would need a different toggle layer for some of the layers (this one would include Escape) while the other layers’ toggle would offer tilde. So now I’m up to six layers, most of which wouldn’t interact with each other. This is where the Configurator began to fall through.

Defining layers is much easier than I thought it would be. The keycodes are all pretty well defined in the documentation. Even layer toggles were straightforward, though there was a little confusion. I wanted to set all layers to toggle from one to the next with a single keystroke, but I couldn’t find a way to do that programmatically, so I would have needed two more layers to achieve that goal. Instead, I used Fn+[kl;’] to select any one of the four base layers, and I made accessible from either of the two momentary layers I had configured, so I would always be able to switch to the one I wanted. I would go on later to indicate those with specific RGB function as a reminder of their function.
The Lighting
The real hurdle for QMK is the lighting effects. From pleasuretek’s repo, there’s some animation effects added in, though how to use and modify them is not obvious at this point. The lights themselves are addressable via bitmask, and there are four individual controllers, so there’s more than a little math and guesswork required to make sure you’ve hit the right lights, and just adding/dropping a character from an existing bitmask is not as simple as you’d hope. There are tools available to make this easier, but it does not become “easy”. One you figure out your bitmask, then you need to insert the mask along with flags, layers, and red/green/blue intensity into a lengthy json array in your code.
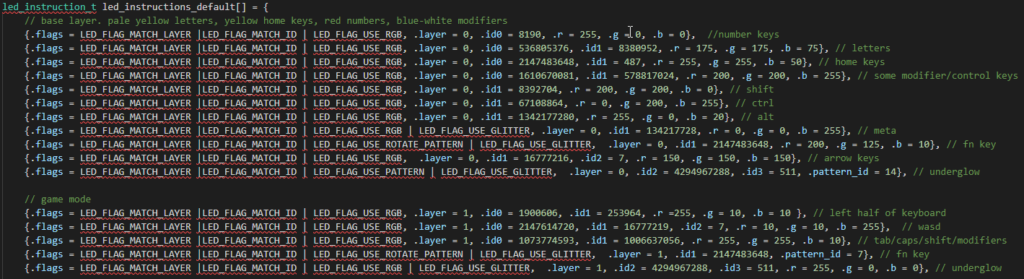
The example in pleasuretek’s repo took it one step further. He decoupled the layer from the color scheme. On his you could cycle animation style or color scheme without actually changing your layers. This is really cool, but overkill for what I wanted, which was consistent and functional coloring with a little flash on the side. I wound up carving a lot of the code out for my example and reducing it down to one instruction set to rule every layer.
Overall, it’s been working pretty well and I’m pretty happy with where I’m at right now. The animations are still a mystery to me. I understand there are flags for patterns and a separate one for the glitter effect, but I can’t seem to figure out how to change the layout of the patters or define different colors for the glitter.
I’m going to keep working at it. This is a really fantastic keyboard and I want to see how far I can push the degree of customization it affords.
Addendum: To better facilitate generating the bitmasks, I created this calculator.